The woman in the makeup chair doesn’t look convinced. “I just don’t get eyebrows,” she laughs, twisting the cap off her eyebrow pencil like it’s a puzzle she’s tried to solve a hundred times before. The makeup artist leans in, studying her face the way a cartographer studies a map. Outside, city traffic hums; inside, it’s just soft light, a mirror, and the quiet concentration of two people trying to coax some order from a pair of unruly arches.
“You’re not supposed to draw eyebrows,” the artist says gently. “You’re supposed to discover them.” And with that, she takes the pencil, tests the tip on the back of her hand, and begins—tiny strokes, almost impossibly light, like she’s sketching something that already exists beneath the surface.
This is the real secret of using an eyebrow pencil correctly: it’s less about drawing, more about listening. To your face. To your natural hair. To the story your brows want to tell.
The Quiet Power of Brows
Stand in front of a mirror and cover your eyebrows with your fingers for a second. Suddenly your expression goes… blank. Eyebrows are not just decorative lines; they’re punctuation marks for your face—commas, exclamation points, and question marks that shape emotion before you even speak.
Pro makeup artists will tell you that if they had to choose just one feature to groom on a bare face before a photoshoot, they’d often go straight for the brows. Not foundation. Not lipstick. Brows. Because when brows are softly defined, your eyes look more awake, your bone structure looks more intentional, and your entire face gains a kind of quiet clarity.
But the line between “softly defined” and “overly drawn-on” is thin—literally. That’s where technique, and a little bit of restraint, comes in. You don’t need a drawer full of products or a high-level art degree. You just need to understand three things: your brow’s shape, your brow’s color, and your brow pencil’s behavior.
Finding Your Real Brow Shape (It’s Already There)
Before any pencil touches skin, every pro begins with the same ritual: they map. Not in a ruler-and-protractor way, but in a quiet, observational way. You can do this at home—no fancy tools required, just your pencil and a bit of patience.
Stand near a window if you can; natural light is kinder, more honest. Brush your brow hairs upward with a spoolie. You might notice gaps and uneven patches, but you’ll also see the hidden blueprint: the way your brow naturally wants to grow.
Now, lightly rest your eyebrow pencil vertically along the side of your nose. Where the pencil edge crosses your brow is where your brow can begin—not where it must, but where your face will look balanced. Keeping the base of the pencil at your nostril, tilt the top so it passes across your pupil. Where it touches your brow is where the arch naturally wants to live. Finally, angle the pencil from the side of your nose to the outer corner of your eye; that’s your natural tail end.
Professional artists don’t treat these points like strict geometry. They treat them as helpful constellations, not prison bars. Your brows might be cousins rather than twins. One might sit slightly higher, or have a shorter tail. Instead of forcing them into perfect symmetry, pro artists look for harmony—how your brows balance with your eyes, your nose, your cheekbones.
And as you stare at your own brows, you might realize: there’s less to “fix” than you thought. There’s more to gently enhance.
Choosing the Right Pencil: Texture, Tone, and Temperature
Color is where many people go wrong, and where most pros get quietly picky. If you’ve ever found yourself squinting at your reflection thinking, “Why do my brows look so… harsh?” it’s often not your technique. It’s the shade.
Here’s how artists tend to think about it: your brow pencil should echo your hair color without shouting about it. It should be slightly cooler or more neutral than your hair at the root, and almost always lighter than your darkest strands. Too dark, and the brows feel stamped onto your face. Too warm, and they can turn orange or rusty by midday light.
| Hair Color | Brow Pencil Shade Guide |
|---|---|
| Very fair blonde / platinum | Light taupe, soft ash blonde (avoid strong warmth) |
| Golden / honey blonde | Neutral light brown or dark blonde with subtle warmth |
| Light to medium brown | Taupe, soft brown, or neutral medium brown |
| Dark brown / black | Soft black, espresso, or deep ash brown (not jet-black marker tones) |
| Red, auburn, copper | Soft brown with a hint of warmth; avoid intense red-brown |
Texture matters just as much. There are stiff, micro-thin pencils that give crisp, hairlike strokes. There are creamier ones that blend easily, almost like a shadow. In a pro’s kit, you’ll find both. For beginners, artists often recommend a slightly firmer pencil—you’re less likely to overdo it, and you can still diffuse the color with a spoolie.
One trick the pros borrow from drawing class: they always scribble a bit on the back of their hand first. This warms up the tip, tests the color, and ensures the lead isn’t too sharp or waxy. If it glides smoothly and leaves a soft, buildable line, it’s ready for your face.
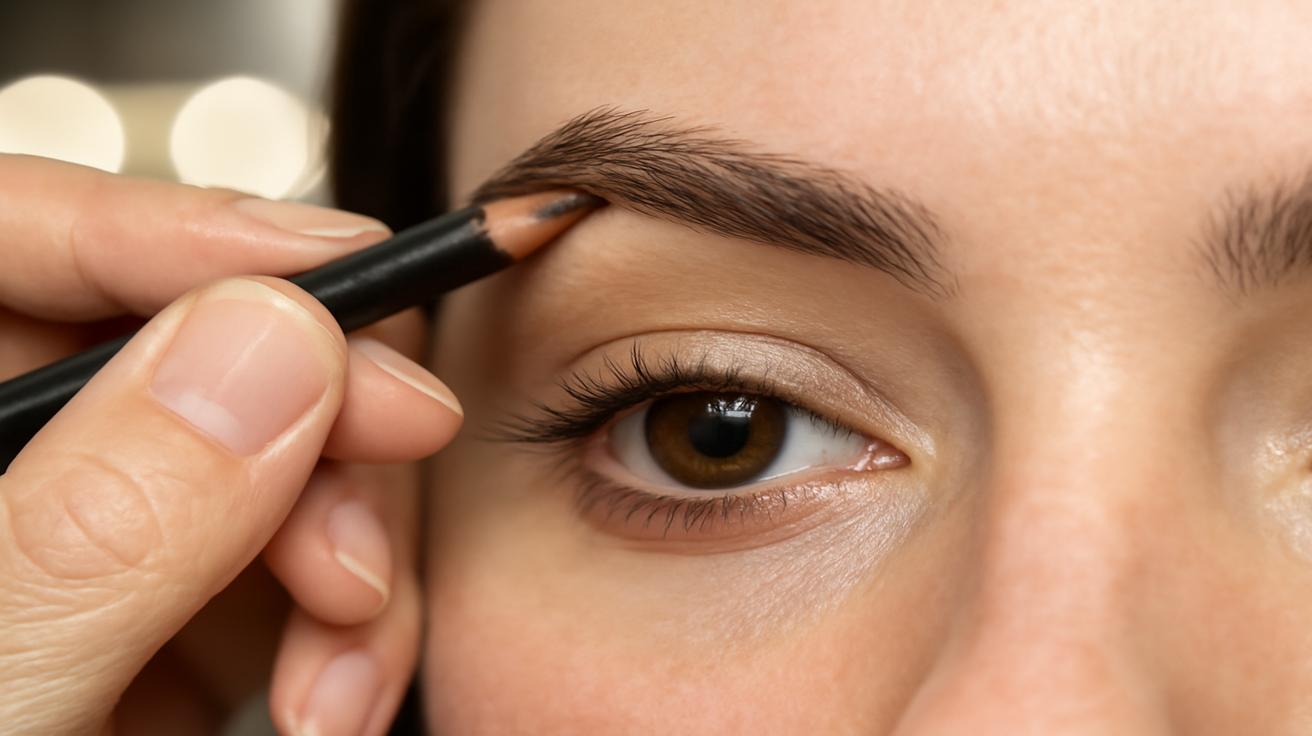
Learning the Pressure of a Feather
Watch a seasoned makeup artist fill in brows and you’ll see something subtle: the pencil hardly seems to touch the skin. Their hand hovers; the strokes are quick, light, and flicked at an angle. They will tell you: “If you hear the pencil scratching, you’re pressing too hard.”
Your goal is not to draw a single line that outlines the brow. Your goal is to create a series of micro-strokes that mimic real hair. Think of how grass grows: individual blades, slightly varied, overlapping. That’s how brow hairs look up close.
Start where you need the most help—usually the tail or the sparse patches, not the very front. Imagine the way your brow hairs grow: upward at the inner corner, then diagonally, then slightly downward near the tail. Match that direction with your strokes. Each flick should start a little firmer at the base and lift off softly toward the tip, so it fades like an actual hair.
Between each cluster of strokes, pause. Brush through with your spoolie. This blends any harsh edges and lets you see what’s really happening. Professional artists rarely do the entire brow in one go; they build in whisper-light layers, adjusting as they go along.
Step-by-Step: How Pros Actually Use an Eyebrow Pencil
If we could slow down that makeup-chair moment to a frame-by-frame tutorial, it might look like this—a quiet ritual, simple but deliberate:
1. Groom and reveal. The artist brushes the brows upward and outward with a spoolie. This instantly shows where the brow is full and where it’s sparse. Any long, wayward hairs get trimmed or tamed with clear gel before the pencil comes out, not after.
2. Map gently, don’t carve. Using the pencil as a guide, they check the start, arch, and tail points. This isn’t about drawing strict borders; it’s about understanding the territory. Sometimes they’ll lightly dot these points so their hand has a destination.
3. Start at the tail. The last third of the brow tends to be thinnest, and this is where added definition looks the most natural. The artist uses tiny diagonal strokes, following the direction of natural hair. The color is soft but more concentrated here; this is the “ink” of the brow sentence.
4. Fill the body. Moving toward the middle of the brow, the strokes become slightly lighter. The goal is even density, not a block of color. After a few strokes, the spoolie comes in again, brushing through to soften any visible lines.
5. Save the front for last—and keep it airy. The inner third is where brows can easily look harsh or “stamped on.” Pros often barely touch this area. With what’s left on the pencil (rarely reloading), they mimic the upward growth of the first few hairs, keeping space between strokes. If the front looks too dense, a clean spoolie is run through in upward motions to restore softness.
6. Refine the edge, resist the urge to outline. If any underside gaps remain, they’re addressed with small, precise strokes—not a drawn line. Outlining the bottom and top edges fully can create a cartoonish border. Pros prefer to “suggest” the shape, letting skin peek through for realism.
7. Set, don’t shellac. Often, a clear or tinted brow gel comes last, combed through in an upward-and-outward motion. It catches the natural hairs, blends the pencil, and gives the brows a lived-in texture instead of a flat, drawn-on one.
Light, Daytime Brows vs. Camera-Ready Definition
Not every brow needs to be red-carpet ready. Artists often adjust their technique depending on whether their canvas is headed to a brunch table or a photo studio.
For everyday brows, they keep things translucent and soft: fewer strokes, more brushing, less emphasis on creating a sharp tail. The goal is to quietly frame the eye rather than announce the brow as the star of the show.
For photos, stage, or long events, the pencil work becomes a hair more precise: a slightly stronger tail, a clearer arch, and sometimes a bit of additional structure at the base of the brow to prevent it from disappearing under bright lights. Even then, they keep the front soft. A too-blocky inner brow reads as “angry” under the camera.
Fixing the Most Common Brow Pencil Mistakes
If your relationship with eyebrow pencils has been complicated, you’re not alone. There are a few classic missteps almost everyone makes—and that artists quietly correct all the time.
1. The “sharpie” effect. This usually comes from using a pencil that’s too dark, pressing too hard, or filling in every millimeter of skin. The rescue plan: switch to a cooler, slightly lighter shade, use the side of the pencil lightly instead of the point, and always brush through with a spoolie. Leaving micro-gaps between strokes lets skin peek through and look like shadow, not paint.
2. Twins, not clones. Trying to “perfect” brows into matching stencils can lead to overfilling. Artists often start with the brow that’s naturally fuller or easier to shape, then bring the other one closer—not identical, just in quiet conversation. Accepting a 10–15% difference between them can save you a lot of overplucking and overpenciling.
3. Overdone front, neglected tail. Heavier shading at the inner brow makes the face look stern or crowded. Instead, think of a gradient: soft at the front, medium through the body, strongest definition at the tail. A single upward brush with a spoolie at the front can instantly soften things.
4. Ignoring your natural hair. Filling far above or below your actual hairline can quickly create an artificial look. Pro artists usually stay within the “forest” of existing hairs, extending only slightly where needed. If they want extra lift, they cheat more along the underside of the arch than the top, which preserves a more believable growth pattern.
5. Skipping the blend. Even the most delicate pencil strokes can look harsh if they sit on the surface unblended. Think of the spoolie as a tiny wind that ruffles the field of color, diffusing hard edges into a soft haze. Two or three gentle passes turn sketch lines into something that looks organic.
When Less Really Is More
Seasoned artists often talk about brows in terms of restraint. They’ll stop, take a step back from the mirror, and ask themselves: “If I add more, will it actually improve the face, or just the brow?” The goal is always the entire face, never just the individual feature.
Sometimes the bravest thing you can do with an eyebrow pencil is put it down. When your brows quietly support your eyes, rather than compete with them, everything else—your skin, your smile, the way you move—reads more clearly.
Letting Your Brows Tell Your Story
Back in the makeup chair, the woman finally leans in close to the mirror. “They look like… my brows, but the version that got eight hours of sleep,” she says. She raises her forehead, wiggles her nose, frowns, smiles. The brows move with her, not against her. They didn’t erase anything. They clarified what was already there.
That’s the quiet magic of using an eyebrow pencil correctly. It’s not about chasing trends—overly arched, ultra-blocky, super-feathered. It’s about learning a handful of small, thoughtful habits: soft pressure, short strokes, a color that respects your actual hair, and a willingness to step back and see your whole face rather than obsess over a single line.
In the end, a well-used brow pencil feels less like a weapon of transformation and more like a sharpening tool. It doesn’t give you new brows; it helps you see the ones you already had, more clearly, more kindly. The mirror stops being a battlefield, and becomes what it was meant to be: a place of recognition.
FAQ
How do I know if my eyebrow pencil is the right shade?
A good rule is to choose a pencil that’s one to two shades lighter than your natural brow hair if you’re dark-haired, and one shade deeper if you’re very fair. Look for neutral or slightly cool tones rather than overly warm ones, and always test on the back of your hand in daylight before committing.
Should I use an eyebrow pencil or powder?
Pencil is ideal for creating precise, hairlike strokes and defining sparse areas or the tail. Powder gives a softer, more diffused look and is great for gently thickening already full brows. Many pros use both: pencil for structure, powder for a soft veil of fullness.
Can I overpluck and rely on pencil instead?
You can, but it rarely looks as natural as working with your existing hair. Most artists recommend minimal tweezing—just the obvious stray hairs—and then using your pencil to fill and shape. Brows tend to thin with age, so preserving what you have is often the best long-term strategy.
How do I make my penciled brows last all day?
Start with clean, oil-free skin. If your skin is very oily, a tiny bit of translucent powder through the brow area before penciling can help. After you’ve filled them in, set the hairs with a clear or tinted brow gel. Avoid touching or rubbing your brows during the day.
What if my brows are very sparse or patchy?
Use the pencil to create small, hairlike strokes only where you truly need them, then gently blend with a spoolie. You can layer a light powder over top for extra fullness. If the gaps are significant, consider working with a professional once to establish a flattering shape you can then maintain at home.