The first time I watched my bathroom grout turn from dingy gray to bright, chalky white in fifteen minutes, I actually laughed out loud. Not because cleaning is funny (it isn’t), but because I couldn’t believe something so simple had been hiding in plain sight for so long. Three ordinary ingredients from the kitchen, a few lazy swipes with an old toothbrush, and the lines between the tiles looked like they’d just been laid by a meticulous mason instead of being scrubbed by a slightly skeptical homeowner in sweatpants.
The Day the Grout Stared Back
There’s a moment, if you live with tile long enough, when you stop seeing the grout as part of the floor or the wall and start seeing it as a guilty secret. One day you walk into the bathroom, or the kitchen, or the hallway, and those narrow lines are all you can look at. They’re not just “a bit off-white” anymore. They’re shadowed. Yellowed. In some places, almost brown. The tiles themselves still look decent under the daylight, but the grout tells a different story—years of footsteps, splashes, and life slowly settling in.
My moment came on a quiet Saturday morning. I stepped into the bathroom with a towel over my shoulder and stopped, mid-step, as if the floor had whispered my name. The tiles were fine. The grout was not. It looked tired, like it had absorbed every rushed shower, every spilled product, every damp towel thrown down in a hurry. It wasn’t filthy, but it was… weary.
I’d tried the usual sprays before. Strong-smelling bottles that promised miracles, demanded scrubbing, and then delivered only “slightly cleaner but still disappointing.” I remember kneeling on the cold tiles, breathing in the sharp bite of chemicals, scrubbing hard enough that my shoulders ached, and then standing up to see pretty much the same tired grout staring back at me. That was the day I basically gave up and decided that “old grout” was just part of having a lived-in home.
But grout has memory. It remembers what color it used to be. And sometimes, all it takes is the right kind of nudge to coax that brightness back to the surface.
The Three-Ingredient Little Miracle
The recipe didn’t come to me from a professional contractor or a cleaning guru, but from a neighbor who always smells faintly of lemon and lives in a house that manages to look both cozy and perpetually clean. You know the kind of person who keeps wildflowers in a mug by the sink and has a dish towel that is somehow never stained? That’s her. When I mentioned, offhand, that my grout was really starting to bug me, she looked at me with a sort of conspiratorial spark and said, “Have you tried the three-ingredient mix?”
I hadn’t. I didn’t even know such a thing existed. But that afternoon, I found myself standing at my kitchen counter with three plain things in front of me:
- A box of baking soda
- A bottle of white vinegar
- A small bottle of hydrogen peroxide
None of them looked like heroes. They were the kinds of things you buy for some specific purpose—baking, disinfecting a scrape, washing windows—and then forget in the back of a cabinet. But in the right balance, they become something oddly powerful.
Here’s the mix I used, simple enough to remember without writing it down:
- 1/2 cup baking soda
- 1/4 cup hydrogen peroxide (3% solution, the regular kind from the drugstore)
- 1 tablespoon white vinegar
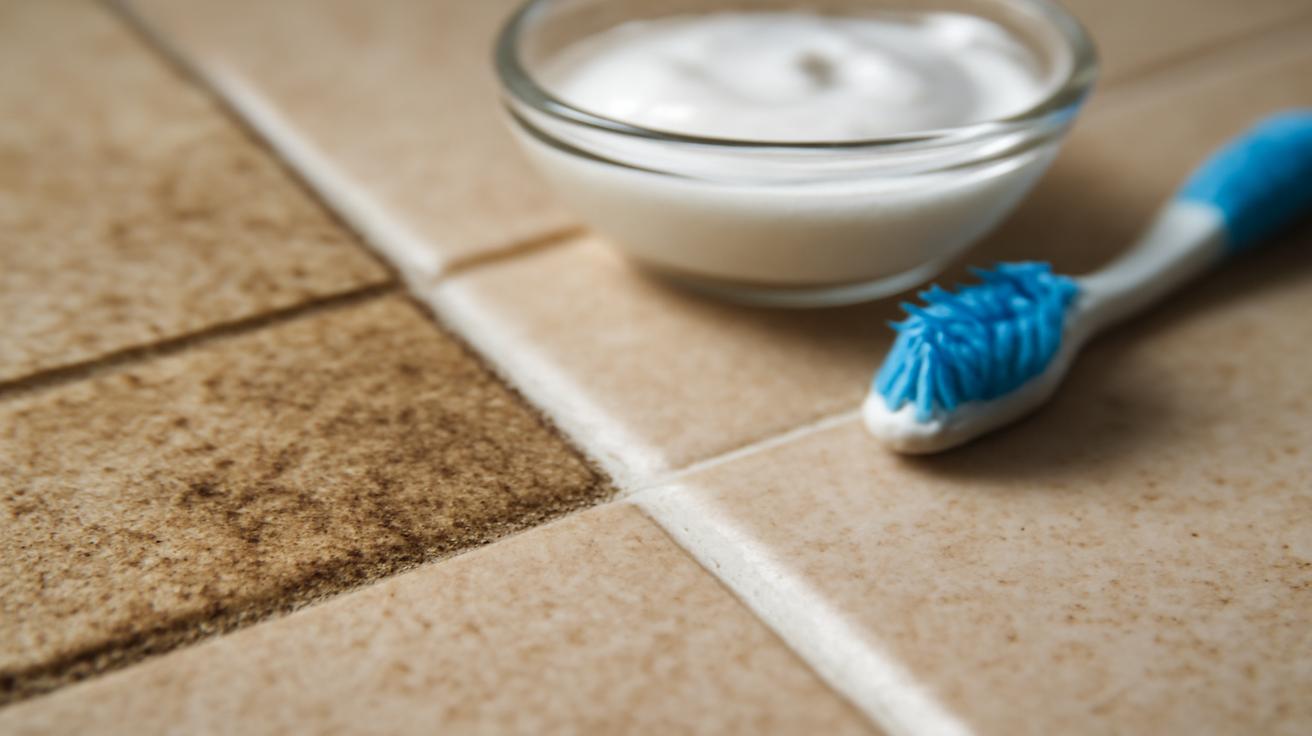
I poured the baking soda into a small bowl first, the powder forming a soft, white mound. Then I added the hydrogen peroxide and listened to the faint fizz as it soaked in, like a quiet sigh of relief. Last came the vinegar—a sharp, almost impatient scent that rose the second it hit the bowl, followed by a lively bubbling that made the mixture look suddenly alive.
In a few seconds, I had a pale, creamy paste. Not too runny, not too thick. When I dipped an old toothbrush into it, it clung to the bristles like it was ready to work.
Why This Odd Little Mix Works So Well
Even before I knelt down on the bathroom floor, I wanted to understand why this trio seemed to have a fan club. There’s something quietly satisfying about knowing the “why” behind the “wow.”
- Baking soda is a gentle abrasive. It doesn’t scratch the tile, but the tiny particles are perfect for loosening the film of dirt, soap scum, and stains sitting in the porous grout.
- Hydrogen peroxide is a mild bleach and disinfectant. It seeps into the tiny pockets in the grout, lifting out stains and lightening discoloration without the harshness of chlorine bleach.
- White vinegar cuts through mineral deposits and soap residue. It helps dissolve the stuff clinging to the grout and boosts the cleaning power of the combo.
Together, they act like a little cleaning team. One loosens, one lifts, one dissolves. They don’t just sit on top of the grout; they sink in, working their way into the places a quick mop never reaches.
On Your Knees With a Toothbrush (But Not for Long)
The bathroom felt strangely still as I knelt on the tiles with my bowl of paste and a toothbrush. Sunlight from the small window landed in a rectangle on the floor, making the faded grout even more obvious. There’s a certain intimacy to being that close to your floor—it’s where all the unseen moments of daily life quietly accumulate.
I pressed the toothbrush, coated in the paste, gently into the first line of grout. The paste spread smoothly, dense and white, completely covering the dingy surface. It felt almost like icing a cake, if cake lived between ceramic squares and smelled faintly of vinegar.
The trick, I’d been told, wasn’t to scrub right away. The mix needed time. So I moved methodically, line by line, working my way down the tiny grid: across one row, then another, and another. The grout lines turned from shadowy gray to milky white under my brush, a temporary masking that promised more.
Within a few minutes, the whole area looked like it had been frosted. That’s when the real magic began: doing nothing. I set the timer for 15 minutes and sat back, leaning against the cool edge of the bathtub, watching as the mixture quietly went to work in a place no one ever writes about in home magazines.
There was no dramatic foam surge, no wild chemical reaction. Just a slow, invisible shift. While I waited, the house felt oddly restful. The faint scent of vinegar mixed with the clean, almost clinical note of hydrogen peroxide. Somewhere in that stillness, the grout began remembering what it used to look like.
The Moment of Truth
When the timer chimed, I reached for a small bucket of warm water and a soft sponge. The first swipe across the grout felt like erasing something from a chalkboard. The paste dissolved quickly, lifting away with a satisfying smoothness. And underneath?
Pure, quiet brightness.
The grout line was pale, clean, and startling. The difference was so sharp it almost looked like I’d drawn a white line between the tiles with some kind of marker. It wasn’t the artificial glare of bleach; it was simply… restored. The kind of clean that feels honest instead of aggressive.
By the time I’d rinsed away the rest of the paste, the bathroom floor looked like it belonged to a newer, slightly more cared-for version of my home. The tiles hadn’t changed, but the grid that framed them had. The entire room looked lighter, somehow. Fresher. As if someone had quietly turned up the brightness dial on reality.
A Ritual You Can Actually Keep
What surprised me most wasn’t just how well the mix worked, but how gentle and manageable the whole process felt. No stinging eyes. No choking fumes. No sense that I should be wearing industrial gloves and a mask just to tidy up my own bathroom.
It felt more like a ritual than a chore. A short one, but still a ritual: mix, spread, wait, wipe. There’s an earthy pleasure in using household staples too—the kind of slow, practical alchemy that makes a home feel both grounded and quietly capable.
Here’s a simple summary of that little ritual, if you like to see things laid out clearly:
| Step | What You Do | What It Feels Like |
|---|---|---|
| 1. Mix | Combine baking soda, hydrogen peroxide, and a splash of vinegar into a paste. | A tiny kitchen experiment—quiet fizzing, sharp but clean scent. |
| 2. Apply | Spread along grout lines with an old toothbrush or small brush. | Slow and focused, like tracing a map across your floor. |
| 3. Wait | Let it sit for about 15 minutes. | A built-in pause: make tea, open a window, breathe. |
| 4. Wipe | Rinse with warm water and a sponge or cloth. | That “oh—wow” moment as the bright grout appears. |
This isn’t a once-in-a-lifetime deep clean. It’s something you can repeat every few months in the rooms that see the most traffic—the bathroom where steam curls around the mirror, the kitchen where coffee spills and pasta water splashes. Instead of dreading “cleaning day,” it becomes a 15-minute reset for the parts of your home that quietly bear the weight of daily life.
Listening to Your Surfaces
There’s also a small, important caveat that lives in the details: grout and tile aren’t all the same. Some are sealed, some aren’t. Some are older, more delicate, or stained beyond the point where this little mix can fully rescue them. So it helps to listen.
- Test your mixture on a small, hidden patch of grout first.
- If the tile is glossy and delicate (especially natural stone), avoid getting vinegar directly on it; keep the paste mostly in the grout lines.
- If the grout is cracked or crumbling, this is a cleaner, not a repair. It may be time to call in a professional or consider re-grouting.
Caring for grout is really about paying attention. When you lean in close and see what’s happening in those narrow spaces, you begin to notice other small things too: a tiny chip in the tile, the way the light hits the floor at a certain hour, the faint pattern of your own daily habits etched into the space.
From Chore to Quiet Act of Care
It’s easy to think of cleaning as something you do against your home—as if the dirt and the dust and the stains are enemies that snuck in while you weren’t looking. But when I smoothed that paste into my grout lines and watched the room brighten fifteen minutes later, it didn’t feel like a battle. It felt more like tending.
There was something surprisingly gentle about it: using common, almost humble ingredients to give back a little light to the places that see everything and say nothing. Those grout lines have been stepped on, splashed, marked, and ignored for years. In fifteen slow, intentional minutes, I was finally paying them some attention.
And that’s the quiet truth hidden inside this three-ingredient trick: it isn’t just about making your floors and walls look new. It’s about noticing the parts of your home that hold the weight of your days and choosing, every now and then, to lift a bit of that weight off.
The next time you catch your grout staring back at you in the morning light—tired, shadowed, a little older than you remember—try this: pull out the baking soda, unscrew the cap on the vinegar, find that half-used bottle of hydrogen peroxide. Stir them together until they become a soft, fizzing paste. Then kneel down and trace the lines of your life, one by one.
Set the timer. Step back. Let the mixture work quietly while you do something small and comforting—make coffee, stretch, open a window and listen to the vague murmur of the day. When the minutes have passed, come back with warm water and a cloth.
As the paste dissolves and rinses away, you’ll see it: the sudden, simple brightness of grout that remembers how to be new. Not perfect, not untouched—just clean, honest, and ready for whatever footsteps come next.
FAQs
How often can I use this three-ingredient mix on my grout?
For most homes, using this mix every 2–3 months on high-traffic areas is enough. In busy bathrooms or kitchens, you can safely use it once a month as long as your grout is in good condition and not crumbling.
Will this mixture damage colored grout?
Hydrogen peroxide is a mild bleaching agent, so there’s a chance it could slightly lighten very dark or colored grout over time. Always test a small, hidden area first to see how it reacts before cleaning the entire space.
Is it safe to use on all types of tile?
It’s generally safe on ceramic and porcelain tiles. For natural stone (like marble, travertine, or limestone), avoid vinegar directly on the stone, as acids can etch the surface. In those cases, keep the paste carefully in the grout lines and wipe promptly.
Do I need to scrub hard for it to work?
No. The mixture does most of the heavy lifting while it sits for those 15 minutes. A light scrub with a soft brush or sponge is usually enough to loosen what’s left before you rinse it away.
Can I store the leftover paste for next time?
It’s best to mix a fresh batch each time. The reaction between baking soda, hydrogen peroxide, and vinegar is most active right after mixing, and the cleaning power fades if it sits too long. If you have extra, use it to clean around taps, sinks, or other small grimy spots the same day.
What if my grout still looks stained after cleaning?
Deep, old stains may not disappear completely in one round. You can repeat the process once or twice more over a few days. If the stains remain, the grout may be permanently discolored or damaged, and re-grouting or professional cleaning might be the next step.
Should I seal the grout after cleaning?
If your grout isn’t already sealed, cleaning is a great time to consider it. Once the grout is completely dry and bright, applying a grout sealer can help protect it from future stains and make your next cleaning session faster and easier.