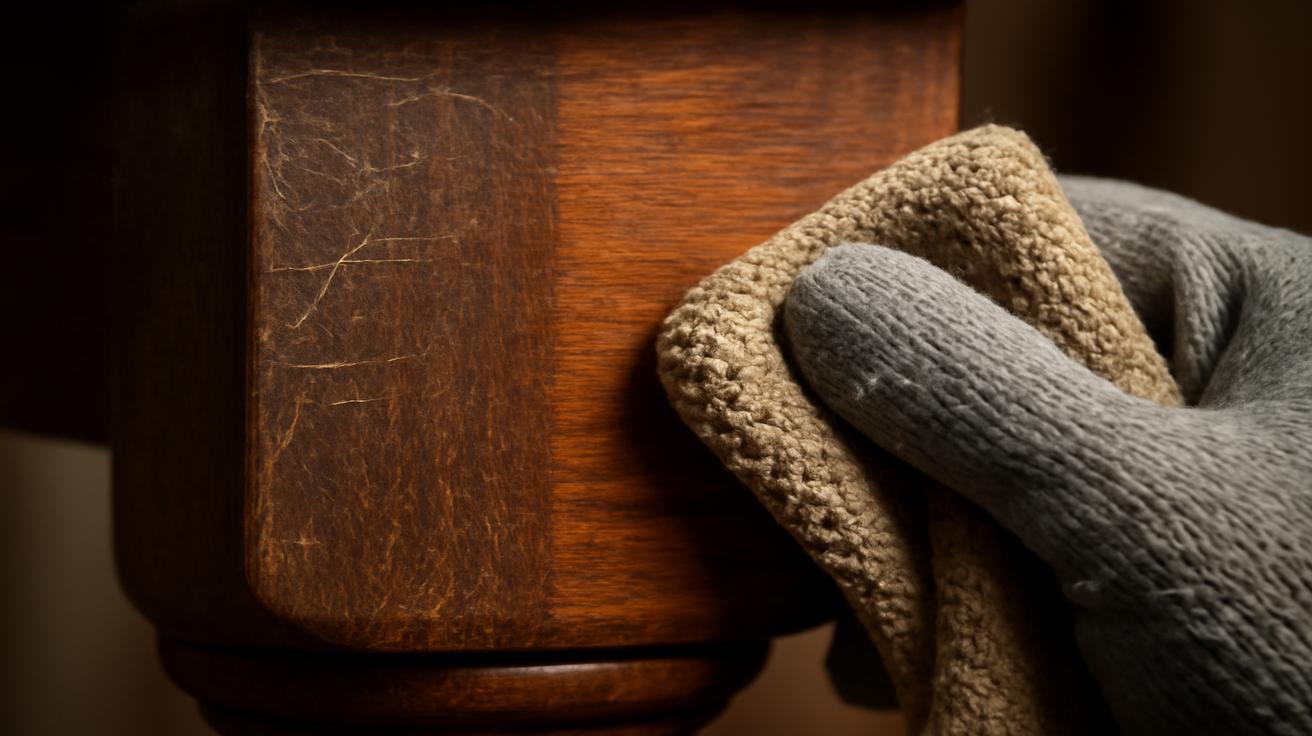
The first thing you notice is the smell. Not the tired, musty odor of a piece of furniture that’s outlived three sofas and a couple of generations, but the gentle, unexpected fragrance of something waking up. There’s orange in the air, and a faint note of beeswax, and beneath it all that unmistakable, almost sweet scent of old wood finally breathing again. In the pool of afternoon light by the window, a scuffed walnut sideboard—with its water rings, cloudy patches, and ghostly fingerprints of long-gone parties—waits patiently. You pick up a microfiber cloth, warm and damp with a homemade solution that looks suspiciously simple, and for a moment you wonder if this is really going to work.
The cloth glides over the surface. At first, nothing much seems to happen. Then a streak of dull gray haze gives way to something deeper, almost like a shadow sharpening into focus. The grain darkens. A ring that has been there since the last family holiday begins to fade, its edges softening as if someone gently erased the memory. Under your hand, the wood starts to feel different—less tired, more alive. It’s a quiet transformation, but a profound one. Restoration experts will tell you this: the magic isn’t in some expensive boutique product; it’s in a simple mixture you can make in your kitchen, and in the deliberate, almost meditative way you apply it.
The Quiet Rescue: How Old Wood Comes Back to Life
Ask a professional restorer what they see when they walk into a home full of tired furniture, and they’ll usually tell you the same thing: most of it isn’t ruined; it’s just dirty, dried out, and misunderstood. That dining table dulled by decades of centerpieces and hot dishes? It might not need sanding. The dresser whose top looks foggy and gray? Probably not doomed. Underneath the haze of oils, polish build-up, airborne grime, and dried-out finish, the wood is almost always waiting to reappear.
The secret, they say, is learning to clean and nourish the finish without stripping it. And that’s where the solution on your microfiber cloth comes in. It doesn’t sound dramatic—some kitchen staples, carefully mixed—but when restoration experts talk about it, there’s a hint of reverence. It’s not just about surface improvement; it’s about careful respect for materials that have already proved their staying power over decades.
One restorer describes the process like “removing a winter’s worth of dust from a forest trail.” The path is always there; you’re just uncovering it. Old finishes, particularly on mid-century and early 20th-century furniture, were meant to be renewed, not replaced. Yet in the rush of modern life, we forgot the gentler methods and reached instead for harsh sprays, silicone-heavy polishes, and all-purpose cleaners that promise shine but quietly choke the wood beneath.
The Simple Solution: What’s on That Microfiber Cloth?
The mixture on your cloth is humble, and that’s precisely why it works. Restoration experts tend to favor variations on the same theme: a gentle, slightly soapy water base to lift dirt, a bit of oil to nourish, and—optionally—something natural like vinegar or lemon juice to cut greasy buildup without attacking the finish itself. There’s no magic brand name, just simple ingredients in a careful balance.
Here is a typical formula restorers might recommend for sealed, finished wooden furniture (not raw or wax-only surfaces):
- Warm water – the base that loosens grime and softens old residue.
- A few drops of mild dish soap – enough to break the surface tension and remove oils without stripping.
- A splash of white vinegar – to dissolve cloudy buildup and old polish films.
- A small amount of natural oil (like olive or mineral oil) – to restore luster and help the finish reflect light again.
The microfiber cloth is the quiet hero of the story. Unlike an old cotton rag, which can push dirt around and leave lint caught in carved edges, microfiber has the uncanny ability to grab and hold onto particles. It slides smoothly over curves, glides into corners, and buffs without scratching. When it’s just damp—never dripping—it can coax years of haze away one gentle pass at a time.
One important rule experts repeat: always test in an inconspicuous area first. The side of a leg, the back corner of a drawer front, the inside edge of a table apron. If the finish responds well—no clouding, no sticky spots—you proceed, slowly, like you’re learning the piece’s language as you go.
The Ritual: Step-by-Step Restoration in Real Time
There’s a rhythm to this kind of work. It’s less like cleaning and more like a quiet conversation with the wood.
1. Start with Dust and Silence
You begin with a dry microfiber cloth, gently removing loose dust. No pressure, no scrubbing, just a soft pass over every surface, into every groove and carved edge. You notice details you’d forgotten: the turned legs, the way the grain curves like the rings of an old tree, the small dents that hint at decades of use.
2. Mix the Solution
In a small bowl or container, warm water swirls with a few drops of soap and a modest splash of vinegar. You add a teaspoon or two of oil and stir until it goes from separate streaks to a light, cloudy mixture. Then you dip the microfiber cloth, wring it out thoroughly, and feel it—just barely damp, almost dry to the touch, but carrying everything it needs.
3. Work in Small Sections
You choose one corner of the piece—a patch of tabletop, a single drawer front, the top of an armrest. With slow, overlapping strokes, you wipe with the grain, letting the cloth do the work. A faint film shows on the fabric: old polish, hand oils, that pale dust you never quite reached with regular cleaning. As you buff lightly with a second, clean, dry microfiber cloth, the wood responds with a subtle glow instead of a sticky shine.
4. Watch for the Change
Somewhere between the first and second section, you notice it: the surface doesn’t just look “cleaner”; it looks deeper. The finish reflects light differently, more like water in shade than a flat painted surface. Scratches don’t vanish, but they quiet down, absorbed into the pattern of the grain. What looked dull and flat becomes something you want to run your fingers over.
5. Finish with a Gentle Buff
When every section has had its moment with the solution, you return with a dry microfiber cloth, buffing the whole piece in long, relaxed strokes. This step is easy to skip, but restoration experts insist on it. Buffing warms the finish slightly, melding the thin layer of oil into the existing surface and bringing out that almost-brand-new clarity without making the wood look plastic or overly glossy.
| Item | What You Need | Expert Tip |
|---|---|---|
| Cleaning Solution | Warm water, mild soap, white vinegar, light oil | Keep it mild; if you smell strong chemicals, it’s too harsh. |
| Cloth | High-quality microfiber, at least two pieces | One damp for cleaning, one dry for buffing and finishing. |
| Testing Area | Hidden corner or underside | Always test before committing to the whole piece. |
| Time | 20–60 minutes depending on size | Work slowly; rushing can leave streaks or missed spots. |
Seeing “Almost New”: The Subtle Art of Expectations
“Almost brand-new” is a particular kind of promise, and restoration experts are careful with it. The goal isn’t to erase the furniture’s story; it’s to let the story be told in a clearer voice. A table that has seen countless meals will still carry a few faint scars. A dresser that moved homes three times may bear a small chip along the edge. These marks, restorers will tell you, are part of the piece’s charm.
What this homemade solution does is restore integrity to the finish so that those stories don’t get lost under a fog of neglect. It revives clarity. Colors seem richer: honeyed oaks look less tired and more golden, darker woods like walnut or mahogany regain the quiet drama they were born with. The transformation feels a bit like cleaning an old photograph: the image is the same, but you can suddenly see every detail again.
There’s something else you notice after you’re done. The surface feels different. Your hand glides rather than drags. Instead of that slightly gummy or plastic sensation left by some commercial sprays, the wood feels like wood again—smooth, cool, softly reflective. The piece looks ready, not for a museum, but for real life: a vase of fresh flowers, a stack of books, a cup of coffee placed carefully on a coaster this time.
What the Experts Warn Against
For all their enthusiasm about simple, homemade solutions, restoration specialists are quick to point out what not to do. The list is long not because wood is fragile, but because finishes can be surprisingly vulnerable to the wrong kind of attention.
- Avoid soaking the wood. Water should never pool or drip. A damp cloth is safe; a wet one is not. Moisture can creep into joints, edges, and tiny cracks, causing swelling or lifting of veneer.
- Skip the ammonia and harsh cleaners. Strong multi-surface sprays, glass cleaners, or anything labeled “degreaser” can strip or cloud delicate finishes and make them patchy over time.
- Be wary of silicone-based polishes. They can create an artificial gloss that traps dust, interferes with future refinishing, and leaves a stubborn residue that professionals quietly dread.
- Don’t scrub with abrasives. Steel wool, rough sponges, or gritty powders might remove dirt—but they take the finish with it, scratching the surface in ways that only full refinishing can fix.
- Know what you’re working with. Raw, oiled, or wax-only finishes need different care. This wet solution is primarily for sealed, finished wood—think varnish, shellac, lacquer, or modern polyurethane.
Experts also talk about patience. You can’t rush a piece that’s been waiting for years. If the furniture is extremely dirty or coated in layers of old wax, several gentle rounds are often better than one aggressive, over-wet cleaning. The goal is gradual transformation, not instant perfection at any cost.
Stories Woven into Grain
By the time you finish restoring a single piece, you’ve probably spent longer with it than you have in years. You notice things. The tiny initials carved under the drawer, the slight dip on the edge where hands have pulled chairs closer for decades, ghostlike rings where vases and glasses once sat. This is the quiet, unexpected gift of restoration: it slows you down long enough to remember that furniture is not just “stuff”; it’s stage scenery to your life.
Many restorers fell into their craft not because they loved furniture, but because they loved stories. They talk about finding crumpled notes in the backs of drawers, or pencil marks on the underside of table leaves that record long-forgotten measurements. They’ve seen the way people light up when a chest that looked destined for the curb suddenly looks like it belongs in a family photo again.
And the remarkable thing is that you don’t have to be a professional to start. A microfiber cloth, a bowl of warm water, a few drops of soap and vinegar, a trickle of oil—these are not specialized tools. They’re as ordinary as it gets. But when you use them slowly, attentively, something of the restorer’s mindset sneaks into your afternoon. You’re no longer just cleaning; you’re participating in the long, ongoing life of an object that might outlast you.
There’s a kind of grounding in that. The world outside might feel fast, loud, and disposable. Inside, you’re making a different choice: to mend instead of replace, to tend instead of toss. The wood responds with a softened gleam, a renewed dignity. The piece is still itself—just more fully so.
Keeping the Glow: Gentle Care After Restoration
Once your furniture has been revived, the question becomes: how do you keep it that way without slipping back into bad habits?
- Dust regularly with dry microfiber. It’s quieter, kinder, and more effective than feather dusters or paper towels, which tend to scatter dust rather than capture it.
- Spot clean with a barely damp cloth. For small spills or fingerprints, a touch of warm water on microfiber is usually enough, followed by a dry cloth.
- Repeat the homemade solution occasionally. Depending on how you use the piece, a light restorative cleaning every few months can keep the finish supple and luminous.
- Use coasters and pads. Old wood isn’t fussy, but water rings and heat can still mar finishes. A little protection goes a long way.
- Respect sunlight. Direct sun can fade and dry out finishes. If possible, shift pieces occasionally or use curtains and blinds to temper the light.
What begins as a single afternoon experiment can quietly become a seasonal ritual: doors open, a soft breeze wandering through the room, a favorite album playing low in the background, and you with a damp microfiber cloth in hand, coaxing back the glow from the objects that hold your daily life together.
It’s not a miracle—just a bowl of warm water, a few simple ingredients, and your attention. But according to the people who work with old wood every day, that’s often all it takes to turn “tired and dated” into “almost brand-new” again.
FAQ
Can I use this homemade solution on all types of wooden furniture?
It’s best suited for sealed, finished wood—pieces with varnish, lacquer, shellac, or polyurethane. Avoid using it on raw wood, unfinished farmhouse pieces, or furniture finished only with wax or oil. Always test in a hidden spot first.
Will this solution remove deep scratches or dents?
No. It can reduce the appearance of light surface scratches and haze, but deep damage usually requires refinishing, filling, or professional repair. This method is about restoring the finish, not reshaping the wood.
How often can I use the solution without harming the finish?
Used gently with a barely damp cloth, it’s generally safe every few months or as needed when the furniture looks dull or cloudy. Daily or very frequent wet cleaning is not recommended; regular dry dusting is better.
Is vinegar safe for all finishes?
In low concentration and mixed with water and a bit of oil, it’s typically fine for most modern sealed finishes. However, on very old, delicate, or unknown finishes, always test first. If you see clouding or stickiness, stop and switch to plain warm water with a tiny amount of soap.
Can I skip the oil and just use soapy water?
You can, especially if the surface is very greasy and you plan to follow up with a dedicated wood polish later. The small amount of oil in the solution helps restore luster and keeps the cloth from stripping too much sheen, so most restorers prefer including it.
What kind of microfiber cloth works best?
Choose a soft, non-abrasive microfiber designed for delicate surfaces, such as those used for glasses or electronics. Avoid cloths with rough edges or heavy textures, and always keep them clean to prevent grit from scratching the finish.
How do I know if my furniture needs professional restoration instead?
If the finish is peeling, flaking, deeply cracked, sticky no matter how you clean it, or if water has caused swelling, lifting veneer, or dark stains, it’s time to consult a professional. The homemade solution is ideal for tired, dirty, or slightly dulled finishes, not for structural or severe finish damage.