The tiles were never the problem. They still gleamed when the late afternoon light slid across the kitchen floor, catching tiny flecks of color baked into ceramic years ago. No, the real villain crept in the narrow lines between them—the grout, once bright and crisp, now a tired gray maze of stains, shadows, and the faint memory of spills. You might recognize this scene: the way your eyes keep drifting down when you walk into the bathroom, the quiet irritation every time you mop and the floor still looks…tired. There’s a particular frustration that comes with dirty grout. It makes everything around it look older than it is, like your home is sighing all the time.
The Afternoon I Finally Got Mad at the Floor
It didn’t begin as a grand home improvement project. It started with annoyance. I was standing barefoot in the kitchen, waiting for water to boil, when I really looked down. Not the casual glance you throw at the floor every day, but the kind of slow, unflinching inspection that invites opinion.
The tiles were fine. But between them, the grout lines were like little storm clouds. Some spots were the color of wet pavement, others a quiet, dingy beige. Close to the stove they looked almost shadowed, like the ghosts of a hundred pasta nights and sizzling pans. Near the fridge, faint orange-ish stains hinted at long-forgotten spills of something sticky and sweet. The mop, it turned out, had only been gliding over the issue. It never reached inside those tiny grooves where life had slowly settled in.
I’d tried the usual suspects: store-bought sprays smelling like a chemical laboratory, harsh scrubbing that left my forearms shaking, and one regrettable experiment with a stiff brush that took off a little grout, along with some of my patience. The results were never dramatic enough to justify the time or the smell. So the grout stayed dirty—and I got used to it.
Until that day with the boiling water and the quiet kitchen and the sudden realization that I was genuinely irritated by a grid of gray lines.
The Three Ingredients Hiding in Plain Sight
The funny thing is, the solution was already in the house. Not in some specialty bottle or fancy kit, but sitting quietly in three ordinary places: the pantry, the cleaning cupboard, and the bathroom drawer. When combined, they become something simple, oddly satisfying, and surprisingly powerful.
The three ingredients:
- Baking soda – the gentle scrubber. Fine, soft, and just abrasive enough to loosen what time has pressed into the grout.
- Hydrogen peroxide – the brightener. It fizzes softly, lifting and lightening stains without the sharp, throat-stinging punch of bleach.
- Dish soap – the quiet helper. It breaks down grease and oils that cling to grout, especially in kitchens, and helps everything rinse away more easily.
There’s a certain delight in realizing that a tiny, homemade mixture can rival those loud-labeled cleaners lined up on store shelves. These ingredients don’t shout. They don’t need neon warnings or cartoon bubbles on the bottle. They sit humbly in the background of your daily life—until the day you decide to mix them together and start paying attention.
The Simple Magic Ratio
The “recipe” doesn’t demand precision, but it does appreciate a sense of proportion. You’re not baking bread; you’re coaxing shine out of shadows.
A good starting mix:
- 1/2 cup baking soda
- 1/4 cup hydrogen peroxide (3%)
- 1 teaspoon dish soap
In a small bowl, the baking soda forms the base, soft and pale as snow. The hydrogen peroxide turns it into a creamy paste, and the dish soap adds a faint silkiness when you stir. It looks harmless. It is harmless enough. But the real pleasure comes later, when you see what it does to those stained little canyons in your tiles.
How to Turn 15 Quiet Minutes into a Small Transformation
There’s a rhythm to this task that feels oddly peaceful. It’s not glamorous work, but it is honest work, the kind that leaves you with a visible before and after. And it begins, very simply, on your hands and knees with a small brush and that soft, pale paste.
Step 1: Let the Floor Tell the Truth
First, sweep or vacuum. Dust, crumbs, and rogue pet hair are all distractions; you want to see the grout clearly. Then, if the floor is particularly grimy, a quick wipe with a damp cloth helps uncover the real condition of the lines. This is the “truth phase,” when you see every tiny stain that’s been quietly building up.
The grout at the edge of the room might be only gently dulled, while the strips near the stove can look nearly fossilized, shadows pressed into place by time and heat. It’s okay. You’re about to interrupt that story.
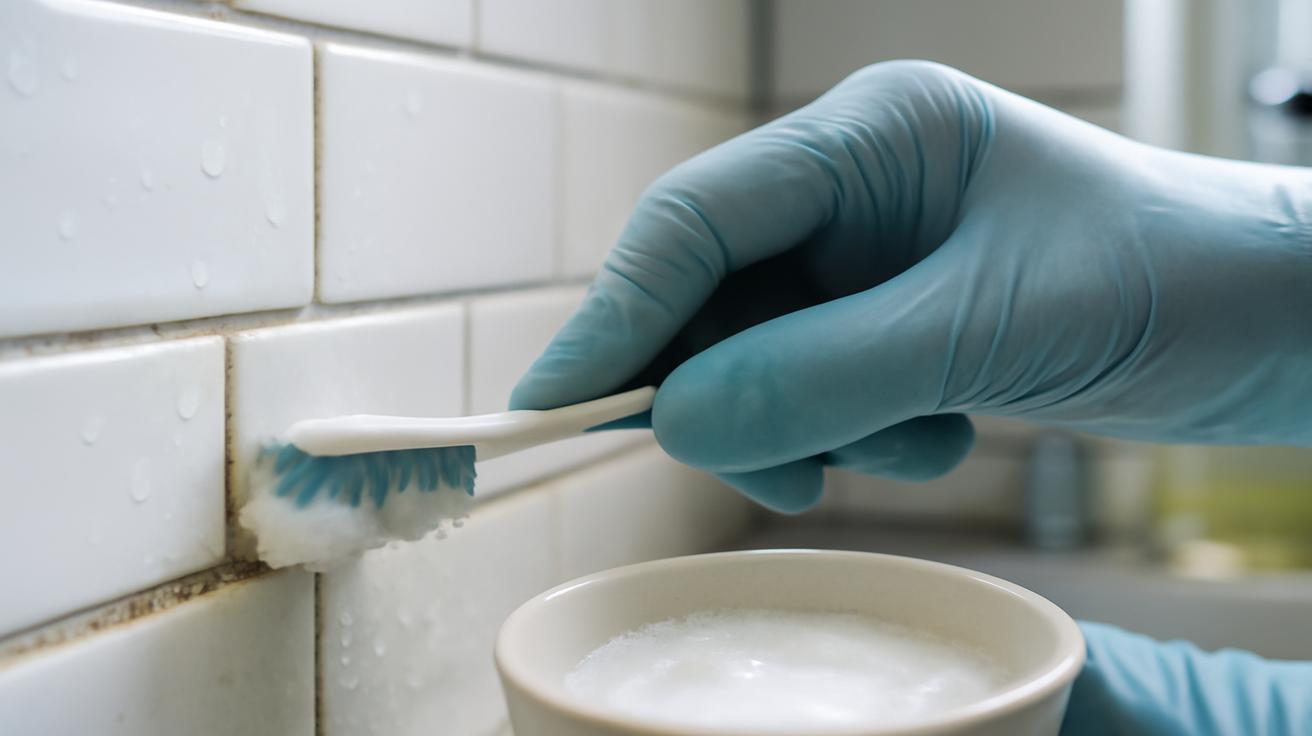
Step 2: Paint the Lines
Dip a small brush—an old toothbrush works beautifully—into the paste. Then trace it along the grout lines, almost like you’re painting delicate paths between tiles. The paste lays down in uneven white ribbons, nestling into tiny crevices and rough spots.
There’s something quietly satisfying about the slowness of it, the way you move square by square, row by row, turning dull gray lines into milky trails. You don’t need to scrub yet. For now, you’re just coating. Cover as much as you can reasonably reach without rushing. This is not a race; it’s a reset.
Step 3: The 15-Minute Wait
Here is the secret: the real work happens while you’re not doing anything at all. Once the lines are covered, you step away. Set a timer for 15 minutes. Walk to another room. Make tea. Open a window. Let the faintly clean, mineral scent drift through the house.
During those quiet minutes, the mixture settles into the grout, the baking soda gently loosening, the hydrogen peroxide fizzing almost invisibly as it lightens stains, the dish soap lifting the greasy film that dulled the color in the first place. There’s something deeply appealing about a solution that asks for your patience, not your exhaustion.
Step 4: The Gentle Scrub
When the timer rings, you return to the scene. Now, your job is simple: wake everything up. Using the same brush, begin to scrub the grout lines in short, firm strokes. The paste, once smooth, now rolls and gathers, pulling up tiny flecks of what was once firmly attached.
This isn’t the harsh, elbow-destroying scrubbing of movies and cleaning commercials. You’re not attacking the floor. The mixture has already done much of the work; you’re just encouraging the last bits to let go. Even after a few strokes, you might start seeing it: the lighter, cleaner strip of grout emerging behind your brush, like a trail of fresh snow cutting across old footprints.
Step 5: The Reveal
Once you’ve scrubbed a section, rinse it. A damp microfiber cloth works well, or a small bucket of clean water and a rag. Wipe, rinse, wipe again if needed. The paste disappears, and in its place the grout lines stand out—suddenly brighter, clearer, closer to the way they looked before life had its long, messy say.
This is the moment when your eye does a double-take. The tiles haven’t changed at all, yet somehow the whole floor looks newer, sharper, almost more intentional. The once-murky grid is now defined again, drawing quiet patterns under your feet.
The Strange Power of Small Transformations
There is something almost intimate about cleaning grout. It’s not a show-off task that visitors are guaranteed to notice. Nobody walks into a house and gasps, “Your grout!” But you’ll notice. You’ll feel it each time you wander barefoot across the kitchen at night or step into the bathroom early in the morning, still half-dreaming.
Rooms carry energy, and much of it comes from tiny, almost invisible details. A patched crack in a wall, a newly oiled cutting board, a plant repotted into fresh soil—none of these things shout. They simply shift the way the space feels, in that subtle, undeniable way that makes you breathe a little more deeply.
Refreshing the grout is one of those details. It’s a reminder that your home is not just a box that shelters you, but a living, evolving space that responds to your attention. It ages, yes—but it can also be renewed, line by quiet line.
A Quick Look at the Mix
If you like things neat and clear, imagine the three-ingredient solution laid out in a simple little chart:
| Ingredient | Role | Why It Helps Grout |
|---|---|---|
| Baking soda | Mild abrasive | Loosens dirt and buildup without scratching most tiles. |
| Hydrogen peroxide (3%) | Gentle brightener | Lifts stains and lightens discoloration, especially in lighter grout. |
| Dish soap | Grease cutter | Breaks down oily residue and helps the mixture rinse away cleanly. |
That’s really all you’re working with: three familiar allies doing what they do best in a slightly new context.
Listening to the Floor: When, Where, and How Often
Not every tile surface is the same, and not every grout story is identical. Some lines have seen only the dust of quiet days; others have been hit by tomato sauce, muddy footprints, soap scum, or the mysterious sticky spots that arrive when children or pets share your home.
For light-colored grout in frequently used spaces—kitchens, entryways, bathrooms—this mixture can become a seasonal ritual. Maybe once every few months, when the sun shifts angles and you notice the floor differently, you return with your bowl and brush. For darker grout, or for tiles tucked into a corner that rarely sees heavy use, you might only need this ritual once or twice a year.
Always test a small, inconspicuous area first, especially if you live with more delicate materials like natural stone. Most ceramic and porcelain tiles are perfectly comfortable with this mixture, but stone can be more particular. Let the grout and tile “speak” in that first small patch. If they respond well, you continue. If something feels off, you adjust or stop. Your home will tell you what it likes, if you let it.
A Quiet Ritual, Not a Chore
There’s another way to think about the 15 minutes of waiting while the mixture sits. It doesn’t have to be dead time. You can use that pause as a soft anchor in the day—a tiny, domestic meditation.
Put the bowl down, set the timer, and instead of scrolling on your phone, listen. Notice the hum of the refrigerator, the faint ticking of cooling appliances, the way light falls differently on clean tiles versus dull grout. Maybe open a window and let outdoor air drift across the floor, mingling with the subtle, almost clinical scent of hydrogen peroxide.
Sometimes, in the middle of wiping away a smear of dried something from the grout, you realize you’ve been ignoring more than just the floor. These little tasks pull you back into the moment, back into your body, back into the physical reality of the place you call home. There’s beauty there, in the repetition, in the focus, in the simple act of tending to what holds you.
When the Grout Looks New Again
When everything is scrubbed, wiped, and left to dry, the transformation feels slightly disproportionate to the effort. You didn’t repaint walls or replace furniture. You didn’t knock anything down or buy anything new. You mixed three common ingredients, spent a handful of minutes tracing lines, waited, scrubbed lightly, and rinsed. That’s it.
And yet, stepping back, the room feels shifted. The grid of grout is no longer a patchwork of shadows but a clean, steady pattern. The tiles look more vivid, more anchored. The whole floor seems to stand a little taller, like someone finally listened to its quiet complaint and did something kind in return.
Later that evening, when the light softens and spills across the tiles again, you might catch yourself pausing at the doorway—not because anyone else will notice, but because you do. Those bright grout lines are like a fresh page in a well-used notebook. The same stories will unfold there: more dinners, more splashes, more hurried mornings. Eventually, the grout will soften in color again. Life does that.
But now you know that, with three familiar ingredients and about 15 minutes of patience, you can bring it back. Line by line. Room by room. Quietly, gently, without fanfare.
FAQ
Can I use this mixture on any kind of tile?
This mixture is generally safe for ceramic and porcelain tiles. If you have natural stone (like marble, travertine, limestone, or slate), test a small, hidden spot first or avoid it altogether—baking soda and hydrogen peroxide can sometimes be too harsh for delicate stone surfaces.
Will this damage my grout over time?
Used occasionally and with gentle scrubbing, this mixture is usually safe for most grout. Excessive, aggressive scrubbing with very hard brushes can wear down grout, but the ingredients themselves are relatively mild compared to many commercial cleaners.
How often should I clean grout this way?
For busy areas like kitchens and bathrooms, every few months works well. For low-traffic areas, once or twice a year may be enough. You can always spot-clean stains in between full sessions.
Can I make a big batch and store it?
It’s best to mix only what you’ll use in a single cleaning session. Over time, hydrogen peroxide breaks down, and the mixture can lose effectiveness. Fresh batches are more powerful and reliable.
What if my grout is very dark or heavily stained?
For deeply stained grout, you may need to repeat the process a couple of times. If the grout was originally light but now looks permanently dark, some staining may be too deep to fully reverse with this gentle mix alone. Even then, many people notice a clear improvement after one or two rounds.
Does this work on colored grout too?
Yes, but always test in a small, hidden spot first. Hydrogen peroxide is gentler than bleach, but it can still lighten some dyes if they’re not colorfast. Testing ensures your grout keeps the color you want.
Can I walk on the floor right after cleaning?
Once you’ve wiped away the mixture and the floor is dry, it’s safe to walk on it. Just be careful while it’s still damp—it can be slippery, especially if a bit of dish soap remains on the surface.