The morning I finally decided to deal with the grout, the kitchen light was almost cruelly honest. Sun poured across the floor in a sharp, clear stripe, and every line of tile grout stood out like a confession. It wasn’t just dirty; it was tired—dull gray instead of soft cream, speckled with old spills and stories of dinners, rushed breakfasts, and muddy shoes. I’d been ignoring it for months. Maybe years. But that day, something about the way the light hit those lines felt like a challenge.
I’d tried the usual fixes before—the harsh-smelling spray from the supermarket, the scrub brush, even one of those “miracle” pens that promise to paint your grout back to new. Each time the result had been the same: fifteen minutes of hope, an aching wrist, and grout that looked… a little less awful, but nowhere near new. So when a friend casually mentioned, “You know you can just mix three things from your kitchen and make that grout look new in about fifteen minutes,” I laughed. But I also listened.
The Day the Grout Fought Back (and Lost)
That night, after the house quieted down, I decided to try it. I liked the idea of using things I already had. No special orders, no mystery chemicals in bright bottles. Just three simple ingredients that sounded almost too ordinary to be powerful: baking soda, hydrogen peroxide, and a tiny bit of dish soap.
There was something grounding about it. I pulled the baking soda box from the back of the pantry. The hydrogen peroxide was sitting in the bathroom cabinet, quietly waiting for skinned knees that hadn’t happened in a while. The dish soap was the same brand I used every day, the smell already tied to a thousand sinks of warm, soapy water.
I lined them up on the counter, half skeptical and half curious. It felt like a small experiment, a kitchen alchemy project. The grout lines on the floor were stubborn and smudged, but in that moment, under the humming kitchen light, they also felt like a problem I might actually be able to fix.
Meet the Three Quiet Heroes in Your Cupboard
Think of this recipe like a little cleaning spell. No flames, no potions, just a few everyday items that transform when they meet. If your home has tile—kitchen, bathroom, hallway, shower—chances are you already own most of what you need.
Here’s what’s hiding in plain sight:
- Baking soda – That familiar white powder you use for baking and deodorizing the fridge. It’s gently abrasive, like nature’s softest scrub pad.
- Hydrogen peroxide (3%) – The clear, slightly fizzy antiseptic you might dab on cuts. In grout-land, it’s a quiet bleaching agent that lifts stains without the sting of chlorine bleach.
- Dish soap – The everyday grease-fighter by your sink. A drop or two helps loosen oils and grime clinging to the grout.
Individually, they’re modest. Together, they’re something else. The baking soda gives texture, the hydrogen peroxide bubbles its way into stains, and the dish soap convinces grease and dirt to let go. The result is a paste that doesn’t just wipe the surface—it behaves like it remembers what your grout once looked like and is determined to return it there.
If you want a sense of proportion, it looks something like this:
| Ingredient | Amount | What It Does |
|---|---|---|
| Baking soda | 1/2 cup | Gentle scrubbing power, helps lift dirt |
| Hydrogen peroxide (3%) | 1/4 cup | Lightens stains, penetrates porous grout |
| Liquid dish soap | 1–2 teaspoons | Breaks down grease and sticky grime |
You don’t need to be exact to the milliliter; grout is forgiving. As long as the mixture becomes a thick, spreadable paste—like pancake batter that changed its mind halfway through—you’re in good shape.
Mixing the Paste: A Small Ritual of Care
There’s a quiet pleasure in mixing simple things with your own hands. I poured the baking soda into a chipped mug. The powder puffed up in a tiny, dusty cloud, catching the light for a second. The hydrogen peroxide followed, turning the white mound into something creamy and alive. I stirred it with an old spoon, the way you might stir a sauce, slow circles, scraping the sides. The consistency began to settle into a silky paste—soft, thick, willing.
A teaspoon of dish soap slid in, a glossy ribbon of blue. A few more stirs, and the mixture shifted, just slightly, almost as if it knew it had a job to do.
There was something calming about it. In a world of glowing screens and endless notifications, this was so physical, so tactile. Just you, a spoon, three ingredients, and a problem you could literally see.
If you try this yourself, mix only as much as you’ll use in about 15–20 minutes. The hydrogen peroxide works best when it’s fresh, not after sitting in a jar for days. Think of it like fresh coffee—best made in small, purposeful batches.
Spreading Light Into the Dark Lines
I knelt on the floor, paste in hand, and realized how much the grout lines looked like the spaces between chapters in a book. Years of living had written themselves into those narrow spaces. Tomato sauce drips. Mud tracked in on rainy days. Soap spills. A dropped berry that rolled away before anyone saw it.
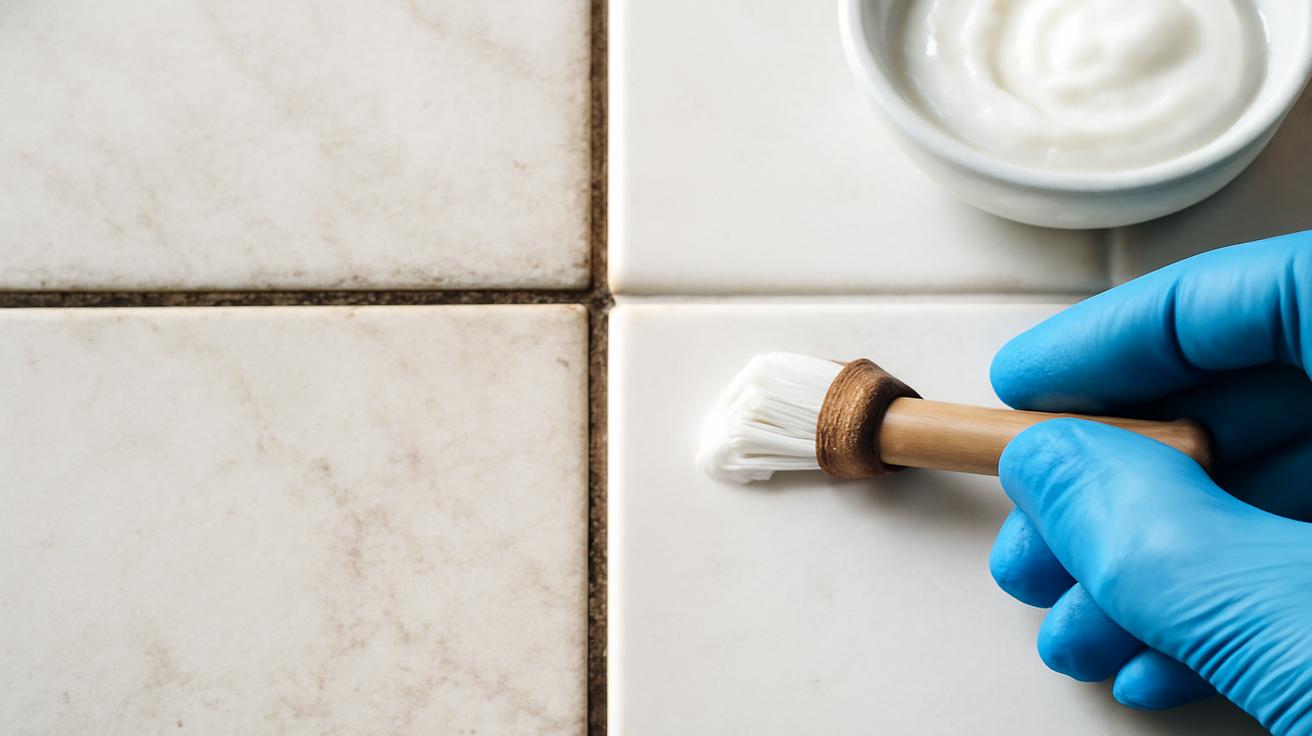
With an old toothbrush, I scooped up a bit of the paste and began brushing it along the grout. The first stroke left a thick, pale trail like someone had traced the line with moonlight. It hugged every dip and pore, sinking into the tiny pits where dirt liked to hide.
The sound was soft—bristles whispering across tile, the tiny sighs of bubbles working in silence. I didn’t scrub yet, not really. This first part is more about coating and covering, the way you butter toast before you take a bite.
Within a few minutes, a whole section of the floor was filled with white lines. The room looked a little wild, like someone had tried to draw a maze across the tiles. And then I did the hardest part of the whole process: I walked away.
This mixture doesn’t demand aggression. It demands time. Fifteen minutes is where the quiet magic happens.
Waiting Fifteen Minutes While the Work Happens for You
Fifteen minutes can feel like nothing or forever, depending on what you do with it. I set a timer on my phone, rinsed the spoon, and just listened. The house felt still, like it was also waiting. Somewhere down at grout level, the baking soda was nudging dirt loose, the hydrogen peroxide was fizzing into stained pores, and the dish soap was persuading oils to let go.
The air carried a faint, clean smell—something between laundry day and a freshly rinsed sink. No chemical sting, no burning in the nose, just a soft whisper of “clean” in the background.
When the timer chimed, the paste on the floor had changed. In some places, it looked darker, mottled, like it had pulled something up from below. The grout beneath it, in flashes where the paste had thinned, already looked paler, like it had taken a deep breath after years of holding it in.
The First Wipe: Suddenly, It’s Not Just Grout
I dipped a cloth into a bucket of warm water and squeezed it out. The first swipe across the line was oddly satisfying. The paste slid away easily, gathering into a soft, cloudy smear on the tile. Beneath it, the grout looked… different. Lighter. Clearer. Almost like the way you see your own face in old photos and think, Oh, that’s what it’s supposed to look like.
I wiped again, this time paying attention. Each line of grout that emerged seemed to rewind the room by a year or two. The dingy, grayish tone that had slowly crept in over time was gone, replaced by a calm, clean color that matched the untouched grout in the corners under the cabinets—the areas life rarely reached.
And here’s the thing: it wasn’t just a “maybe it’s better?” kind of change. It was obvious. The way you walk into a freshly painted room and don’t have to squint to notice the difference.
As I moved across the tiles, rinsing and wiping, the floor seemed to brighten. Each newly revealed line of grout sharpened the pattern of the tiles, giving the whole room a quiet, refreshed clarity. The kitchen felt somehow lighter, even though nothing had changed but the color of the lines between the tiles.
Why This Simple Mix Works So Well
If you’re the sort of person who likes to know why something works, there’s a small kind of beauty in the science happening on your floor.
- Grout is porous. It doesn’t just get dirty on the surface; it absorbs stains, oils, soap scum, and moisture, almost like stone or dense sponge.
- Baking soda sits on the grout and creates a mild scrubbing texture that doesn’t scratch tile but does loosen dirt inside the pores.
- Hydrogen peroxide seeps down into those tiny spaces, breaking down color-causing compounds and gently bleaching without the harshness of chlorine.
- Dish soap cuts through oils, grease, and soap residue, which often form a sticky layer that locks in dirt.
Instead of throwing one big, harsh chemical at the problem, you send in a quiet team, each with its own role. There’s a kind of elegance in that—a reminder that big changes often come from small, steady forces working together instead of one dramatic solution.
And the best part is how quickly it happens. Around the fifteen-minute mark, most light to moderately dirty grout will show a remarkable difference. Heavy staining or years of neglect might need a second round, but even then, you’re working with a simple mix you can stir together in less time than it takes to make tea.
Little Tweaks, Gentle Wisdom
As with anything in a home, there are small lessons you pick up along the way:
- Test a corner first. Grout varies. Try a hidden area to see how it responds.
- Use a soft brush. A toothbrush, small detail brush, or soft grout brush helps guide the paste into the lines without shredding the grout.
- Don’t let it dry rock-hard. Fifteen to twenty minutes is plenty. If the paste dries completely, just re-wet with warm water before wiping.
- Rinse well. A final pass with clean water makes the tiles shine and removes any baking soda haze.
- Seal if you can. Once clean, a grout sealer (applied later) can help keep it looking newer, longer.
There’s a quiet satisfaction in learning your own home this way—understanding that those faint gray lines were not permanent, just patiently waiting to be cared for.
Seeing Your Space With Fresh Eyes
When I finally stood up and looked at the floor from across the room, I had to laugh a little. It was the same tile. The same layout, the same pattern, the same room I’d walked through thousands of times. But it felt… new. Or maybe “honest” is a better word. The grout was no longer a reminder of every spill and footprint; instead, it framed the tiles cleanly, like a picture that had finally been dusted.
And something subtle happened after that. I noticed myself walking barefoot more often, lingering at the counter, taking the time to wipe small spills when they happened instead of shrugging them off. Caring for the grout turned out to be a way of caring for the whole room, and in a small way, for myself.
There’s a particular kind of joy in realizing that transformation doesn’t always require money, or power tools, or hours of labor. Sometimes it’s sitting in your cupboard, waiting for you to decide that today is the day you’ll mix three humble ingredients, kneel for a quarter of an hour, and watch old, tired lines come back to life.
Grout is such a quiet thing. But when it changes, the whole space changes with it. In just fifteen minutes, with a spoon, a cup, and a little patience, the room that had been bothering you for months can suddenly feel like somewhere you’re happy to stand barefoot again, coffee in hand, morning light streaming in, and not a single gray line to steal the moment.
Frequently Asked Questions
Is this mixture safe for all types of grout?
For most standard cement-based grout, this mixture is gentle and effective. However, always test in a small, hidden area first. For specialty or colored grouts, especially very dark ones, a test patch ensures you’re comfortable with how it reacts.
Can I use this on natural stone tiles?
Be more cautious with natural stone like marble, travertine, or limestone. Baking soda is mildly abrasive and hydrogen peroxide can sometimes affect stone finishes. If you have natural stone, keep the paste focused on the grout lines only and avoid scrubbing the stone surface itself. Always patch-test first.
How often should I clean my grout this way?
For busy areas like kitchens and bathroom floors, every few months works well for most homes. In less-used spaces, once or twice a year can be enough. Between deep cleanings, regular sweeping and mopping help prevent buildup.
Will this remove mold or mildew from grout?
Hydrogen peroxide does help lighten and reduce mold and mildew on grout surfaces. For stubborn mildew in damp areas like showers, you may need to repeat the process and also improve ventilation so the area can dry thoroughly between uses.
Can I store leftover paste for later?
It’s best to mix only what you’ll use right away. Hydrogen peroxide loses strength over time once exposed to air and light, so a fresh batch will always work better. If you do store some briefly, keep it in an opaque, sealed container and use it within a day.
Do I need to scrub hard to see results?
No. The mixture does most of the work while it sits. A gentle scrub with a soft brush before wiping is usually enough. If you’re resorting to serious elbow grease, let the paste rest a bit longer or apply a second round.
Why does my grout get dirty so quickly?
Because grout is porous, it absorbs spills, soap, oils, and even muddy water from mopping. High-traffic areas collect more of everything. Once your grout is clean, sealing it helps slow down staining and makes future cleanings much easier.