The first time I tried to clean the oven in my tiny apartment, I ended up sitting on the kitchen floor, back against the cabinets, wondering how something that only ever sees food could possibly look (and smell) like a chemistry experiment gone wrong. The door glass was ghosted with old splatters. The racks had a brown, baked-on armor that refused to budge. I’d already opened one harsh cleaner, only to be stopped cold by the eye‑watering fumes. I remember thinking, There has to be an easier way than this—something that doesn’t feel like suiting up for battle.
The Day the Oven Fought Back (And Lost)
Most of us have a story like this. Maybe yours involves a holiday roast that erupted in a splash of fat, or a berry pie that boiled over in a purple avalanche. The evidence is still there every time you open the door: dark streaks, dull patches, wisps of burnt-on smell that greet you before the preheat is even done.
You tell yourself you’ll deal with it “next weekend,” but next weekend turns into next month, and soon the oven turns into a place you’d rather not think too hard about. You cook anyway, you ignore the crusted corners, and when guests come over, you silently pray they won’t be too curious about what’s going on behind that glass door.
Then, one day, maybe while scrolling through cleaning hacks or listening to a friend who swears their grandmother never scrubbed an oven a day in her life, you hear about something that sounds almost too simple: steam. Just steam, they say, like a gentle cloud rolling into a canyon of baked-on grime. Let the heat and water do the work. No rubber gloves, no gas mask, no stinging in your throat.
That idea lodges in your mind. Could it really be as easy as pouring water in a hot box and waiting? The next time you look at the oven, instead of dread, you feel something else: curiosity.
Why Steam Is the Oven’s Quiet Superpower
Before we get into the “how,” it helps to understand the “why.” The magic of the steam-clean oven trick isn’t really magic at all—it’s physics plus patience.
When water heats up in your oven, it turns into steam and expands, seeping into tiny cracks and crevices of the baked-on mess. Grease and food residue that have dried into something resembling enamel begin to soften. The high humidity loosens their grip on the metal and glass. Instead of chiseling and scrubbing, you’re gently persuading the grime to let go.
It’s the same reason a bathroom mirror fogs in a hot shower, or why a kettle left whistling will soften whatever is stuck nearby. Moisture plus heat equals release. The difference in the oven is that you’re harnessing that steamy environment deliberately, and you’re doing it in a way that is far less aggressive than blasting your kitchen with chemical fumes.
You might picture steam-cleaning as something industrial—a big gadget in a professional kitchen, a specialty tool. But here’s the quiet revelation: if you have an oven, a baking dish, and some water, you already have everything you need for the most low-effort deep clean your oven has seen in years.
The Simple Gear You Already Own
The steam-clean trick doesn’t ask much of you. No expensive tools, no complicated steps, no techy settings. Just:
- A heatproof baking dish or roasting pan (glass or metal)
- Hot tap water
- Optional: a splash of white vinegar or a spoonful of baking soda
- A soft cloth or sponge
- A dry towel or microfiber for polishing
There’s something quietly satisfying about solving a stubborn problem with things you already have at hand. It feels like reclaiming a little control in a space that often feels ruled by spills, timers, and endless dishes.
How to Steam-Clean Your Oven: The Slow, Gentle Reset
Let’s walk through the process like a recipe—measured, calm, and pleasantly straightforward. Imagine you’re about to cook a meal, but this time, the final dish is a clean oven.
Step 1: Clear the Stage
Start by removing the oven racks and any stray pans or sheets you might have stored inside (we all do it). This gives the steam room to circulate and keeps the metal from blocking the rising moisture.
If the racks are especially grimy, you can set them aside for a separate soak in the sink or bathtub later, but don’t worry about them yet. Today’s focus is the cavern itself—the walls, base, and door.
Step 2: Set Up the Steam Bath
Fill your oven-safe dish about halfway with hot tap water. You want enough volume to sustain good steam, but not so much that sloshing is a risk. If you’re feeling ambitious, add one of these gentle boosts:
- A splash of white vinegar: Helps cut through grease and odors.
- A spoonful of baking soda: Softens stains and helps deodorize.
Place the dish on the middle rack of your oven. If your oven has no rack in the middle, use the lowest available one, but centered is ideal so the steam can rise and spread evenly.
Step 3: Turn Up the Heat
Close the oven door and set the temperature to around 225–250°C (about 425–480°F), or to a “steam clean” setting if your oven happens to have one. Let the oven heat for 20–30 minutes. During this time, the water transforms into thick, swirling steam that fills the chamber, wrapping around every crumb and crusted ridge like a warm fog rolling through a forest.
The oven will look exactly the same from the outside; the real work is happening invisibly. Grease that once felt like it had become part of the metal begins to soften, swelling as it drinks in the moisture, loosening its stubborn bond.
Step 4: Let It Sit, Let It Soften
After the heating period, turn the oven off—but keep the door closed. This next part is where the magic intensifies. Let the oven sit, sealed, for at least 20–30 more minutes while it cools down slightly. The fading heat keeps the steam swirling and condensing on cooler surfaces, dragging grime down with it in little streaks and droplets.
When the timer dings, open the door slowly. A soft cloud of warmth will rise out, scented faintly of vinegar if you used it, or just clean and neutral if you didn’t. Let the oven cool enough that you can comfortably reach inside without wincing from the heat.
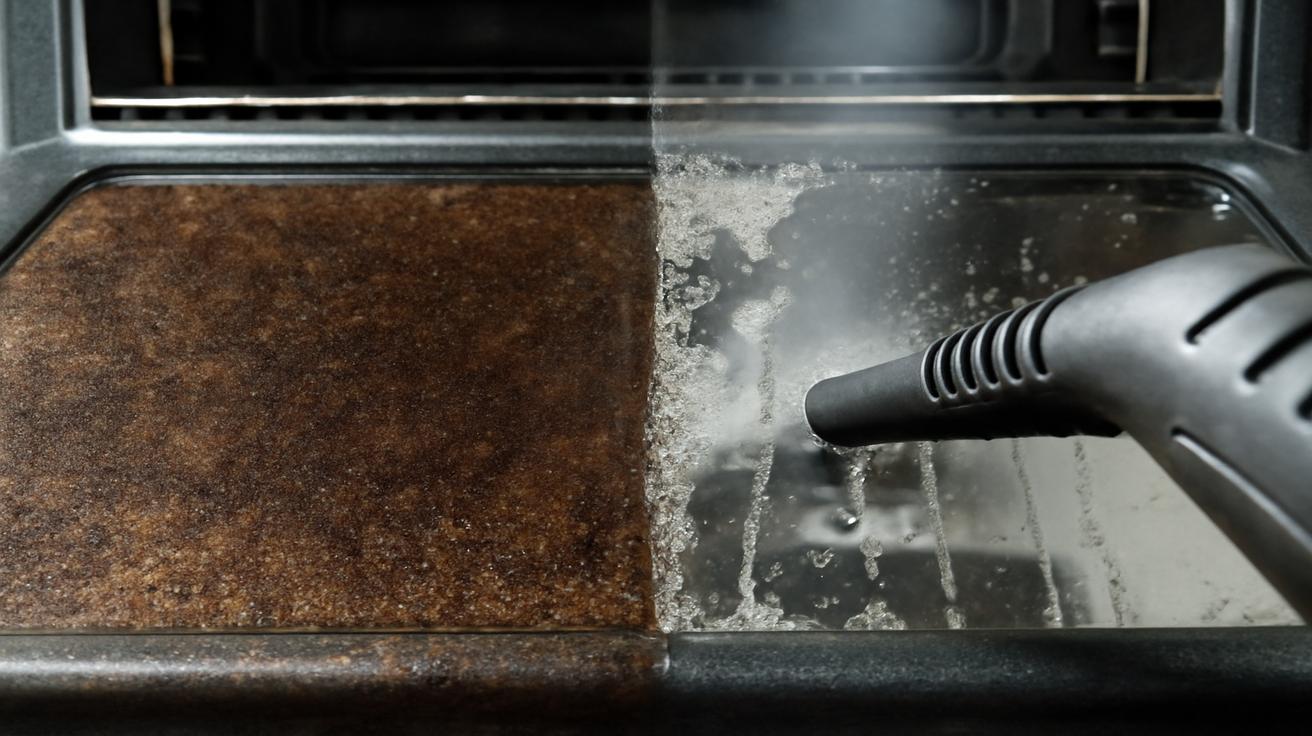
Step 5: Wipe, Don’t Scrub
Now comes the part that feels almost unfairly easy. Take a soft cloth or sponge, dampen it with some of the still-warm water from your dish, and gently wipe the sides, base, and ceiling of the oven. You’ll feel it right away: that resistant, crusty layer has turned into something closer to wet clay.
No furious scouring, no metal brushes. Just slow, satisfying strokes. The grime lifts in gray and brown swirls onto your cloth, revealing metal and enamel that you might not have seen clearly in months—or years.
For stubborn corners or thick patches, you can:
- Dip your cloth in a little baking soda and water paste for a gentle scrub
- Let a damp cloth rest on the spot for a minute, then wipe again
When the interior looks clean, give everything one final pass with a fresh, damp cloth to pick up any residue, then follow with a dry towel to buff and dry. As the surfaces lose their moisture, they regain that quiet, matte or glossy sheen they had when the oven was new.
The Glass Door: Clearing the Window to Your Work
There’s a special kind of satisfaction in restoring the oven door glass. It’s the window to your food—the lens that lets you watch biscuits rise and cheese bubble. When that glass is cloudy with splatters and streaks, it’s like trying to watch a movie through frosted glass.
Fortunately, the steam trick works here too, and you can give the door a bit of extra care:
- After steaming, open the door fully and let it cool slightly.
- Sprinkle a thin layer of baking soda directly onto the glass.
- Dip a corner of your cloth into warm water (with or without a splash of vinegar) and gently rub the baking soda into the glass in little circles.
- Wipe clean with a fresh, damp cloth, then dry with a soft towel.
You’ll watch the haze disappear in front of your eyes, revealing a clear, reflective surface that makes the whole oven feel somehow lighter and younger, like it just took a deep breath.
A Quick Look: Time, Effort, and What You Actually Do
Here’s a simple overview of what this looks like in real time, especially if you’re fitting it around the rest of your day:
| Step | What You Do | Active Time | Hands-Off Time |
|---|---|---|---|
| Prep | Remove racks, fill dish with water (plus optional vinegar/baking soda), place in oven. | 5 minutes | 0 minutes |
| Heat & Steam | Turn on oven, let water steam inside. | 0 minutes | 20–30 minutes |
| Soften | Turn oven off, keep door closed. | 0 minutes | 20–30 minutes |
| Wipe Down | Wipe interior and glass, spot-treat stubborn areas. | 15–25 minutes | 0 minutes |
| Finish | Final rinse wipe and dry, replace racks. | 5–10 minutes | 0 minutes |
Most of this process is the oven doing its quiet work while you do something else—read a few pages of a book, prep tomorrow’s lunches, or just sit with a cup of tea listening to the distant ticking of cooling metal.
When to Add a Little Extra Help
Steam-cleaning can feel miraculous, but it’s not a magic wand. If your oven has seen years of spills, or if you’re dealing with a particularly stubborn patch of carbonized grease, you might need to repeat the process or offer a little tactical support.
For Extra-Stubborn Buildup
If a section stays rough and dark after your first steam-clean, try this:
- Repeat the steam process once more, focusing on that area.
- When the oven is warm and damp, apply a paste of baking soda and water, let it sit 10–15 minutes, then wipe.
- Use a non-scratch nylon scrub pad if needed—still avoiding heavy scraping.
The key is persistence without aggression. Each gentle pass peels back another layer of neglect until, slowly, the original surface emerges again.
If Your Oven Has a Built-In Steam or Self-Clean Setting
Some newer ovens include a “steam clean” feature that basically does this for you: a lower-temperature cycle that uses water to soften grime. If you have this, you can simply follow your manufacturer’s instructions, often adding a cup or two of water to the base and starting the cycle.
Self-clean cycles (the super-hot, several-hour kind) are another story. They can work well, but they’re intense—reaching very high temperatures, sometimes triggering strong smells or even smoke alarms. Steam-cleaning offers a gentler, everyday alternative that’s kinder to your nose and your nerves.
Living with a Cleaner Oven (Without Turning It into a Chore)
Once you’ve watched your oven transform from dull and crusted to clean and light again, it’s tempting to vow that you’ll never let it get that bad. And while life has a way of laughing at our best intentions, there are small things you can do to keep the steam trick easy and effective.
Little Habits That Make a Big Difference
- Wipe spills while they’re fresh: If something bubbles over, wait until the oven is warm (not hot) and wipe it up the same day. Warm residue is easier to lift.
- Use a tray or sheet under messy dishes: Slide a baking sheet under pies, casseroles, and cheesy bakes. Better to clean a pan than the oven floor.
- Steam-clean regularly: Instead of waiting until it’s dire, do a mini steam-clean every month or two. A shorter cycle, less grime, and almost no elbow grease.
- Keep a cloth nearby: Store a designated “oven cloth” or sponge near the kitchen so you’re more likely to give the door a quick wipe now and then.
These tiny rituals stack up, like little acts of kindness to your future self. The oven goes from being a looming chore to something that feels quietly under control—a tool you live with, not a monster you avoid.
FAQ: Your Steam-Clean Oven Questions, Answered
How often should I steam-clean my oven?
For a typical home kitchen, steam-cleaning every 4–8 weeks works well. If you cook or bake frequently, especially with roasts, casseroles, or cheesy dishes, aim for the shorter end of that range. The less buildup you allow, the quicker each clean becomes.
Is steam-cleaning safe for all ovens?
Most standard electric and gas ovens handle this method just fine. However, always check your manual if you have a specialty model, a very old appliance, or a built-in steam or self-clean function. Avoid pouring water directly on heating elements or electronics—keep it in a sturdy dish.
Can I use soap or cleaner with the steam method?
You don’t need to, and often it’s better not to. Steam plus water (and optionally vinegar or baking soda) is usually enough. If you do use a mild cleaner on a particularly stubborn spot, apply it with a cloth after steaming, then wipe thoroughly with plain water afterward.
Will steam-cleaning remove burnt smells from my oven?
Yes, in many cases. By loosening and removing the burnt-on residues that cause lingering odors, steam-cleaning often freshens the smell of your oven significantly. For extra deodorizing, add a splash of vinegar to the water and finish by wiping surfaces with a damp cloth and a bit of baking soda, then rinsing.
Can I steam-clean the oven racks too?
You can, but they often benefit from a separate soak. While the oven steams, place the racks in a bathtub or large sink with hot water and a bit of dish soap or baking soda. After an hour or two, most grime will wipe away with a sponge. For very stubborn patches, a nylon scrub pad can help.
How long do I need to wait before cooking again?
Once the oven is dry and cool, you can cook again right away. If you used vinegar, any faint scent will usually vanish during the first few minutes of preheating. If you detect any residue, give the interior a quick extra wipe with a damp cloth and dry it.
What if my oven has heavy, years-old buildup?
In that case, think of steam-cleaning as a series of gentle resets rather than a one-time miracle. You may need to repeat the process two or three times, combining it with baking soda paste on the worst spots. Each round will make a visible difference, and you’ll likely still avoid harsh chemicals and heavy scrubbing.
Can I leave the water dish in the oven while it cools completely?
Yes. In fact, leaving the dish inside while the oven cools helps maintain the steamy environment longer, softening more grime. Just remember to remove it before you next preheat the oven for cooking.
In the end, the steam-clean oven trick is less about chasing perfection and more about reclaiming ease. It turns a dreaded task into something almost meditative: water, heat, time, and a few slow, satisfying wipes. The grime melts away, the glass clears, and your kitchen feels just a little more like a place you want to linger, with the quiet hum of an oven ready for whatever you dream up next.